Radon testing only works if the test is placed correctly, and research shows radon tests should be placed in the breathing zone about 2–6 feet above the floor so they measure the same air your family actually breathes every day.
Key Takeaways
| Question | Quick Answer |
|---|---|
| Where should I place a radon test in my house? | On the lowest livable level you use regularly, typically the basement or first floor, following EPA-style placement rules explained in our Columbus library radon testing guide. |
| How high off the floor should a radon test be? | Place the device in the normal breathing zone, usually 2–6 feet above the floor, to reflect true indoor air conditions. |
| Can I put a radon test near a window or door? | Avoid drafts and outside air. Keep tests at least 3 feet from exterior doors and windows and at least 1 foot from interior walls, which we also highlight in our Columbus radon zone overview. |
| Which room is best for a radon test? | Choose the lowest level where someone spends at least 4 hours a day, often a basement family room, bedroom, or first-floor living room, as discussed in our Columbus Dispatch radon investigation summary. |
| How long should a short-term test run? | Most short-term tests run 3–7 days under closed-house conditions. For local timing tips, see our Columbus Radon Awareness Week 2026 article. |
| Does radon test placement change mitigation cost? | Accurate placement helps avoid repeat tests and surprises when you later install a system that can cost $1,200–$2,500, as we lay out in our radon mitigation cost breakdown for Columbus. |
1. Start With The Right Level: Which Floor To Test First
When homeowners ask us where to place a radon test, we always start with the level of the home, not the specific corner of a room.
Standard guidance is clear: you should test the lowest livable level of your home that you use regularly, such as a finished basement or first floor family room.
Lowest Livable Level Explained
The “lowest livable level” is any floor where someone could reasonably spend extended time, not just where you store holiday decorations.
If you have a finished or semi-finished basement with a TV, office, or kids’ play area, that is usually the first place to test.
What If The Basement Is Unfinished?
If your basement is truly unfinished and rarely used, your primary test should be on the first floor where you spend the most time.
You can still test the basement later to understand worst-case conditions, especially if you may finish it in the future.
Multi-Level Homes And Split-Levels
In split-level homes, choose the lowest level that is used for living, not just mechanicals or storage.
For large or complex homes, it is often wise to run more than one test at the same time on the lowest lived-in level.
2. Exact Height And Distance: How Far From Floors, Walls, And Windows
Once you pick the correct floor, the next step is setting the radon test at the right height and distance from walls, windows, and doors.
Correct placement avoids distorted readings caused by drafts, dead air pockets, or direct contact with surfaces.
Ideal Height In The Breathing Zone
For most homes, that means setting the radon test between 2 and 6 feet above the floor, which matches where we actually breathe.
Many device instructions recommend around 20 inches to several feet above the floor, but staying within the breathing zone is the key principle.
Clearance From Doors, Windows, And Walls
Keep the test at least 3 feet from exterior doors and windows and at least 1 foot from interior walls to reduce the impact of drafts and temperature swings.
Staying at least 12 inches from exterior walls helps keep outdoor air from diluting or exaggerating radon levels near the test.
Space Around The Device
Do not wedge the test into a corner, shelf cubby, or behind furniture.
Maintain at least 4 inches of space around the device in all directions so air flows freely around the sampler.

3. Choosing The Right Room: Bedrooms, Basements, And Living Spaces
Placement is not just about the floor, it is about where people actually spend their time.
We recommend you test in rooms where someone regularly spends at least four hours per day on the lowest livable level.
Best Rooms For Radon Testing
- Basement family rooms or rec rooms that are used often
- Lower-level bedrooms or guest rooms
- First-floor living rooms or dens above crawlspaces or slabs
Avoid kitchens, bathrooms, and laundry rooms for primary testing because humidity and ventilation patterns can fluctuate significantly.
Handling Open Floor Plans
In large open areas, put the test in a central location away from exterior doors and high-traffic pathways.
If you have multiple seating zones, place the device near the area where people sit the longest, such as near the main couch or desk.
Multiple Tests For Larger Homes
For homes with more than one heavily used area on the lowest level, running two tests can provide a clearer picture.
In very large spaces, building guidance often suggests at least one test for every 2,000 square feet to keep coverage reliable.
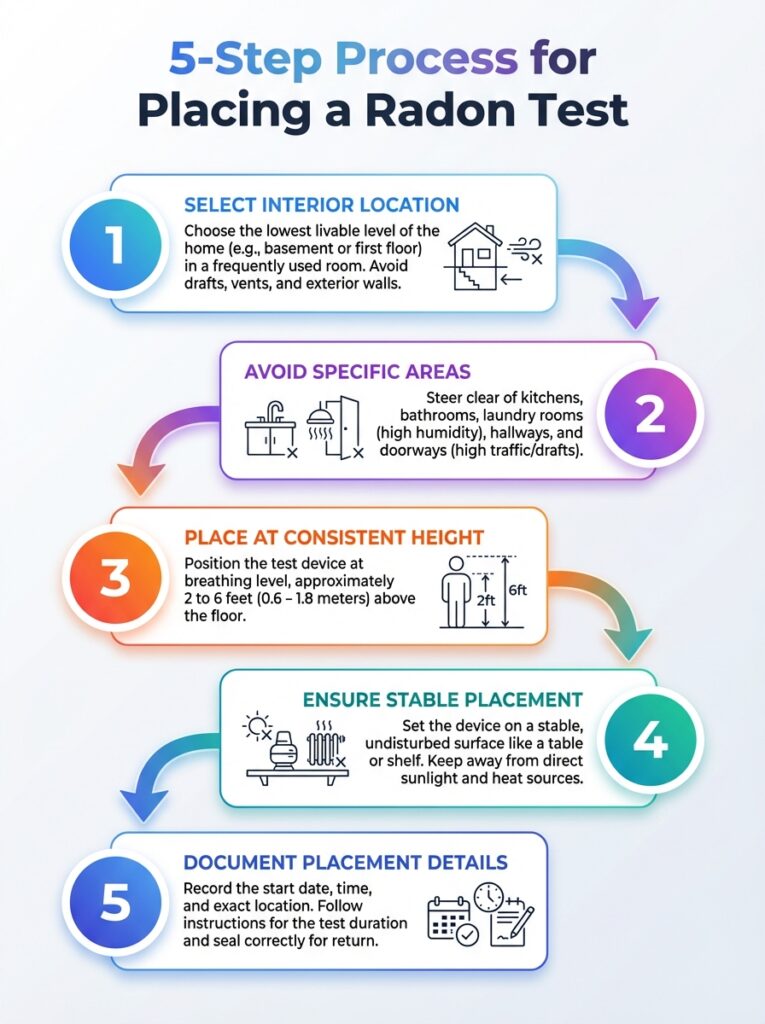
This infographic breaks down the 5-step process to correctly place a radon test. Learn practical locations and tips for accurate results.
Did You Know?
Keep the radon test at least 3 feet away from exterior doors and windows and at least 1 foot from interior walls to reduce the influence of drafts and outdoor air on your results.
4. Special Rules For Basements, Crawlspaces, And Slab Homes
In Columbus and across Central Ohio, foundation type has a big impact on radon entry, and that affects where you should place your test.
Basements, crawlspaces, and slab-on-grade homes each require slightly different thinking about the “lowest livable level”.
Basement Homes
For homes with basements, place your first test in any finished or regularly used basement room, using the breathing-zone height and clearance rules above.
If the basement is partially finished, test near the area with the most seating or sleeping activity.
Crawlspace Homes
In crawlspace homes, your lowest livable level is usually the first floor above the crawlspace.
Put the device in a central living area or bedroom directly above the crawlspace, since that is where soil gases typically seep upward.
Slab-On-Grade Homes
For slab-on-grade construction, the testing level and the slab are usually the same.
Place the device in a main living area on that slab level, away from exterior doors and large windows that open frequently.
5. Using Library Radon Monitors: Practical Placement Tips
We are big supporters of the Columbus Metropolitan Library radon testing program, which lets residents borrow continuous monitors at no cost.
Even with professional-grade monitors from the library, placement still matters just as much as with a mail-in test kit.
How To Place A Library Monitor
Set the monitor on a stable surface like a table, desk, or shelf in the lowest livable level, not on the floor or pressed against a wall.
Follow the same breathing-zone height rules, and be sure the power cord does not tempt anyone to move or unplug the device during the test period.
Room Choice With Continuous Monitors
Because library monitors show real-time fluctuations, choose the room where people spend the most time on the lowest level so the graph matches actual occupancy patterns.
You can move the monitor to a second room for a new test period, but do not move it during a single continuous test.
Reporting Results Accurately
When you return a library monitor, record which room and floor you tested so you can understand what the numbers truly represent.
This context will be valuable if you decide to contact us for a professional test or mitigation quote later.
6. Closed-House Conditions And Test Duration: When Placement Starts To Matter Most
Even if you choose the perfect room and height, leaving windows open or fans running can undermine the test.
Most short-term tests run for 3 to 7 days, and many require “closed-house” conditions for about 12 hours before and throughout the test.
What Closed-House Conditions Mean
Closed-house conditions usually mean keeping windows closed and avoiding large ventilation changes, such as whole-house fans or continuous exhaust fans.
You can still use normal heating and air conditioning, but do not place the test directly in the path of supply vents.
Why Duration Affects Placement
The longer the test, the more days of regular living it captures, so try to place the device where daily life actually happens on that level.
A test tucked away in a corner nobody uses does not reflect what you breathe during the week, no matter how long it runs.
Seasonal Considerations
Columbus homes often see higher radon levels in winter when homes are sealed up, which makes correct placement even more important.
If you test in a shoulder season with more open windows, strictly maintain closed-house rules to keep the reading meaningful.
7. Common Radon Test Placement Mistakes To Avoid
After thousands of tests in Central Ohio, we see the same placement errors over and over, many of which lead to confusing or unreliable results.
Avoiding these mistakes will save you time, stress, and repeat testing.
Top Placement Errors
- Placing the device directly on the floor instead of in the breathing zone
- Setting the test near fireplaces, space heaters, or drafts
- Testing in kitchens, bathrooms, or laundry rooms
- Hanging the device directly next to an exterior door or openable window
All of these can either dilute or exaggerate radon readings compared to what you usually breathe.
Interference From Kids, Pets, And Cleaning
We often see tests placed on coffee tables or low shelves where pets and children naturally play with them.
Choose a stable spot that is out of reach and let everyone in the home know not to move or cover the device.
Ignoring Manufacturer Instructions
Every device type has specific placement instructions that work together with the general principles in this guide.
Always read and follow the instructions that come with your kit or monitor, then overlay our room, height, and clearance recommendations.
Did You Know?
Short-term radon tests are typically conducted for 3–7 days, and many require closed-house conditions beginning about 12 hours before you start the test to give a reliable snapshot of indoor radon potential.
8. Multiple Devices, Side‑By‑Side Testing, And Large Areas
There are times when using more than one radon test device in the same home makes sense, especially in larger properties or during real estate transactions.
Placement strategy changes slightly when two or more devices operate at the same time.
Side‑By‑Side Tests
If you run two devices in the same room for comparison, place them side by side with about 4 inches between them.
This minimizes any air-flow differences while still allowing you to cross check readings from both devices.
Large, Open Spaces
For big finished basements, open-concept living rooms, or commercial-like spaces, consider at least one test for every 2,000 square feet of floor area.
Locate each device in a representative occupied zone, not all in one corner, so you cover the full extent of the space.
Different Levels Over Time
You can test different levels in sequence, starting with the lowest livable level, then moving higher in later tests.
Always interpret upper-level results in light of the lowest-level result, since radon typically enters from soil in contact with the foundation.
9. Real Estate Transactions: Placement During A Home Sale
During a home sale, radon tests carry financial implications, especially in a high-risk area like Franklin County where many homes test above 4.0 pCi/L.
Because buyers and sellers often negotiate based on a single test, following placement rules precisely becomes even more important.
Who Chooses The Location?
In most transactions, a third-party tester or home inspector picks the test location, usually on the lowest livable level.
We follow recognized guidelines for floor, room, height, and clearance to ensure the result is defensible for everyone involved.
Occupied Rooms Only
During a sale, tests should still focus on rooms that are livable and could reasonably be used as bedrooms or living areas.
Testing a raw mechanical room or storage-only space is not representative of how the home will be used.
Why Proper Placement Protects Both Sides
Accurate placement helps buyers understand actual conditions and helps sellers avoid disputes about “improper” tests later.
If mitigation is needed, transparent placement supports realistic pricing discussions around systems that often run between $1,200 and $2,500 in Columbus.
10. Interpreting Your Results Based On Where You Placed The Test
Once the test period ends, the number you see only makes sense if you remember exactly where and how you placed the device.
Location, floor, room type, and whether closed-house conditions were followed all shape how we interpret that value.
Document Your Placement
Write down the floor, room, and approximate distance from windows and doors when you set the test.
This simple record helps us, or any professional, give better recommendations after you get your results.
Comparing Levels And Rooms
If you tested more than one area, note which test represents the main occupied space on the lowest level.
Higher readings in that space carry more weight than a similar reading in an area that no one uses regularly.
Planning Next Steps
If results are elevated, accurate placement information helps us design a targeted mitigation plan instead of guessing where radon is entering.
That kind of precision can reduce installation surprises and help keep total radon system costs within the typical Columbus range of about $1,200 to $2,500, with long-term 10‑year costs often between $2,800 and $4,200 when you include maintenance.
Conclusion
Where you place a radon test matters just as much as whether you test at all.
By choosing the lowest livable level, picking an occupied room, setting the device in the breathing zone, and staying clear of drafts and walls, you give yourself reliable information you can actually act on.
As Central Ohio specialists, we have seen how correct placement avoids repeat tests, supports fair real estate negotiations, and leads to properly sized mitigation systems instead of guesswork.
If you are unsure about where to place your radon test in your specific home layout, we are always happy to walk you through it step by step so your results truly reflect the air your family breathes every day.